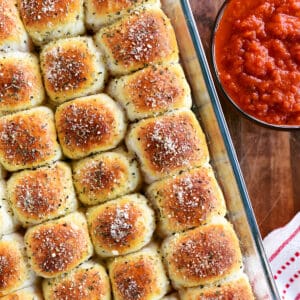
Easy pepperoni rolls are a great appetizer! Whether you make these pizza balls with biscuits, bread dough, or crescent rolls they are sure to be a family favorite. Moms like them because they are easy to make and kids will like them because they are bite-sized pizzas!
Every time I make Easy Pepperoni Rolls I get rave reviews They are super easy to make and are a great snack or appetizer. These pizza balls are Pillsbury biscuits filled with pepperoni and cheese.
Disclaimer: This post contains links to products for making this recipe. If you use those links, I may earn a commission. Learn more here.
How To Make Easy Pepperoni Rolls
Step One:
Gather the following ingredients: 3 cans Pillsbury Buttermilk Biscuits (10 biscuits per can), pepperoni slices, Colby & Monterey Jack cheese, eggs, grated Parmesan cheese, Italian seasoning, garlic powder and pizza sauce.
Step Two:
Cut the block of Colby & Monterey Jack cheese into at least 28 squares.
Step Three:
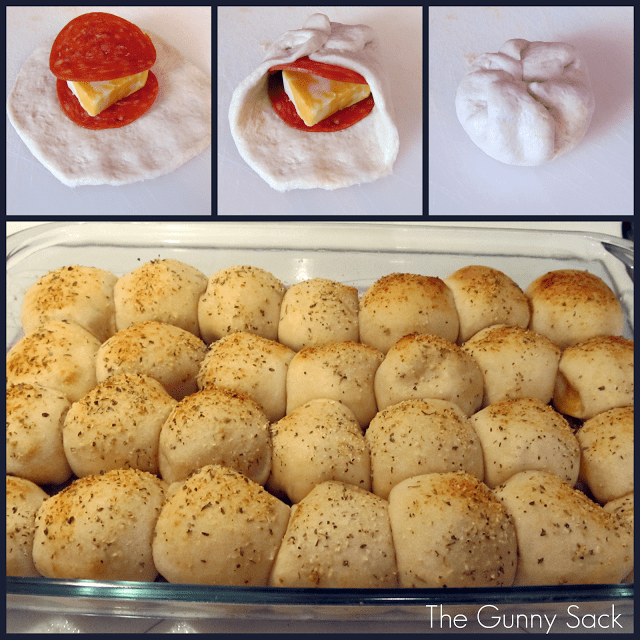
Flatten a biscuit into a circle. Stack a slice of pepperoni, a cube of cheese, and a second slice of pepperoni on top of the dough circle.
Step Four:
Gather up the edges of the biscuit around the stack of pepperoni slices and cheese cube.
Step Five:
Pinch the dough together and now you have a cute little bundle.
Step Six:
Continue until there are 28 pepperoni rolls.
Line the pepperoni rolls up (seam side down) in a greased 9×13 in. pan.
Brush with beaten egg. Sprinkle with grated Parmesan cheese, Italian seasoning, and garlic powder.
Bake at 375°F for 18-20 minutes, until golden brown.
Step Seven:
Serve the rolls with warm pizza sauce for dipping.
Easy Pepperoni Rolls Frequently Asked Questions
1. Can these easy pepperoni rolls be frozen and reheated?
Yes! Follow all of the steps and fully bake the pepperoni rolls. Allow them to cool completely and then freeze them in an air-tight container. To reheat the pepperoni rolls, bake them in the oven at 350°F for 10-15 minutes.
2. Can easy pepperoni rolls be prepared ahead of time and baked before serving? Possibly. Pillsbury dough is formulated to be baked right after you open the tube of dough. For the best possible results, use bread dough instead of Pillsbury dough to prepare the pepperoni rolls ahead of time.
3. If I can’t purchase Pillsbury biscuits, what can I use instead? Bread dough is a great alternative to Pillsbury biscuits. An easy option is Rhodes frozen bread dough. Follow the directions on the package for thawing the dough so that it is ready when you want to make the pepperoni rolls. Another option is to use crescent roll dough.
4. Can I use Pillsbury Grands biscuits instead? Yes! Cut the biscuits in half before flattening them since they are bigger in size.
5. Is the egg wash necessary? The egg wash helps the toppings stick and tops of the pepperoni rolls brown. They can be made without it if preferred.
6. Can other cheeses be used? Definitely! Use whichever cheese you prefer. You can even use shredded cheese, cheese sticks or string cheese.
7. What about other toppings and fillings? These pepperoni rolls can easily be turned into anything you want! I’ve made sausage pizza balls, mac ‘n cheese balls, bacon cheeseburger pizza balls, cheese bombs, and taco bites.

Easy Pepperoni Rolls
Ingredients
- (2) 16.3 ounce tubes refrigerated buttermilk biscuits
- 56 pepperoni slices
- 8 ounces colby jack cheese
- 1 large egg beaten
- 2 tablespoon grated parmesan cheese
- 1 teaspoon Italian seasoning
- ½ teaspoon garlic powder
- 15 ounces pizza sauce
Instructions
- Preheat the oven to 375˚F. Cut the block of cheese into 32 squares. You will only use 28 of them. Save the remaining squares for another use.
- Slice each biscuit in half. Flatten each half into a circle. Stack a slice of pepperoni, a cube of cheese, and a second slice of pepperoni on top of the dough circle.
- Gather up the edges of the biscuit around the stack of pepperoni slices and cheese cube. Pinch the dough together around the filling creating a little bundle.
- Line the rolls up, seam side down, in a greased 9×13 inch pan or on a greased, rimmed sheet pan (about 17x13-inch).
- Brush with beaten egg.
- Sprinkle with grated Parmesan cheese, Italian seasoning, and garlic powder.
- Bake at 375°F for 15-19 minutes.
- Serve the pepperoni rolls with warm pizza sauce for dipping.


sharon says
These are quick and easy for a quick snack or lunch. The only complaint I have, is the amount of time. I set timer for 18 minutes and they were just on the edge of being burnt. I will lower the temp next time to perhaps 400 and check it after 16 min the next time. Otherwise, good.
Monica says
Agree! I just made these following the recipe and they’re burnt!
Cecilia says
Im going to take this to a potluck, thinking of making them a hr. before i leave for work. Well it hold up good, or do u think i should try something else. Can they sit at room tempeture for 2 hr. any suggestions would help.
Tonia says
I think they will hold up for that amount of time but with the cheese inside them, I’m not sure they should sit at room temp for two hours.
Tenielle says
This is what is for dinner tonight!
Maria says
This recipe does not work! Help!
Tonia says
In what way?
Robin W says
This worked great for me. I’m
Curious what went wrong for you???
Beulah says
These taste great and are so very easy to make. I didn’t brush the tops or use the sprinkle-on mix — just too lazy. When I make them again, I will:
1. Buy only a 5-biscuit tube and divide each biscuit in half because whole ones are too big for me. I think they’d make great, small hors d’oeuvres. Might even consider dividing the biscuits into quarters;
2. I will pinch them shut more carefully and maybe try baking them pinched side up like a Chinese dumpling. Even though I placed them far apart on non-stick foil on my cookie sheet, the cheese melted out of a few and ran into the others (totally my fault);
3. For those who asked about freezing : I put five in the freezer just now for my lunches later. Will let you know how that works out!
Thank you for this recipe, Tonia.
Courtney says
Bake them in muffin tins (without wrappers) to keep the cheese from spreading out.
Anne Lamott says
We loved these. And they were so simple. I can see how you could fill these up with all kinds of good fillings…
Chanel says
Just made these today and they are super yummy! Actually stuffed them with pepperoni and a 1/2 small meatball with mozz cheese. It is just my husband and I so I used a can of the grands and cut eat one in half so the pan made 16 pizza rolls.
Megan Vaughn says
We are having these tonight. My daughter loves them and we had fun making them.
Allen says
Made these last night for my pizza fans at home. Used 2 pepperoni slices on the bottom and one on top. Used shredded parm on the top at the beginning. At 20 mins the rolls were done but the tops were more well done than we would have liked. Next time we are thinking wait 5 or 10 mins and then put the parm on top. We did add quite a bit of it, though. Also considering trying mozzarella cheese stick chunks instead of the colby jack for the stringyness.
But overall, fantastic!! A full pan and the 3 of us were stuffed, although they were so tasty, we could have eaten another pan of them! Thanks!
chef aicha says
Thank you for your efforts I’ll try this recipe
Victoria says
Hi! Will this dish work with a dark metal pan instead?
Thanks!
Tonia says
Yes, but dark metal pans tend to cook a little faster so check on the pepperoni rolls to see if they are done. Enjoy! ~Tonia
Kathy says
What size cheese block? 8oz or larger????
Tonia says
Hi Kathy,
It really depends on how cheesy you want the rolls to be. I used an 8 oz cheese block. Enjoy!
~Tonia
Seth says
Just made these for my boyfriend and I tonight! We were craving pizza and I thought it would be something fun and easy we could put together! I chose to use fresh Mozzarella and Munster cheese in mine, and it was PHENOMENAL!!! Great recipe, and thanks for sharing!!!
Brylie says
I just made these and they were amazing! I highly recommend these!
Ashley says
These turned out great! Because I wanted to pack these as part of my lunch when I work, I chose to put the sauce inside, Some of the sauce leaked out when it was cooking but overall it turned out great, I also chose to use real garlic I minced and put on top before putting in the oven.
Debi B. says
*SO* glad I found the original post of this! I had seen it on Facebook but the version I had saved showed pizza sauce in the ingredients but it was not listed in the directions. What to do with the sauce??? So happy to find the correct version! I am a high school cooking teacher AND a former caterer (closed my business to go back to school to be a teacher at the age of 50!) and incorrectly written recipes are a BIG peeve of mine. I actually give my students bad recipes and we play “What’s Wrong With This Recipe?” So again, thank you thank you thank you …… I am VERY happy to have found the original and correct recipe! My kids will be making it this month in class!!
Tonia says
Thanks Debi! They aren’t supposed to be sharing the whole recipe on Facebook, but they continue to do so anyway. They should just share an image with a link to my post for the recipe. I hope your class enjoys the recipe!
jerrica says
I’ve made something like this before but mine turned out really really greasy..what can I do
Peggy says
These are awesome! I just reheated some that I had frozen for over a month and they were just as good as the first time! I’d suggest baking at 350 degrees for about 10-15 minutes or until golden brown.
YUM!
Evelyn says
is the texture more of a doughy bite? Could I use Pillsbury pizza dough?
Tonia says
Yes, you can use pizza dough instead.
Erica says
I made these just as directed and they are delicious! I’ve tried pepper jack cheese to add a little extra flavor (not that it was needed) and that was great too! I did freeze them without a problem. Defrosted and reheated in the toaster oven for about 5 minutes at 350. Be careful to watch them though because I burned the first batch in the toaster oven reheating because I walked away. Definitely try these!